

LAMP的环境原理
LAMP:是由Linux、Apache(httpd)、MySQL/MariaDB和PHP/Perl/Python这些开源软件所搭建起来的web应用平台。平台主机可以是独立的也可以在一台主机上
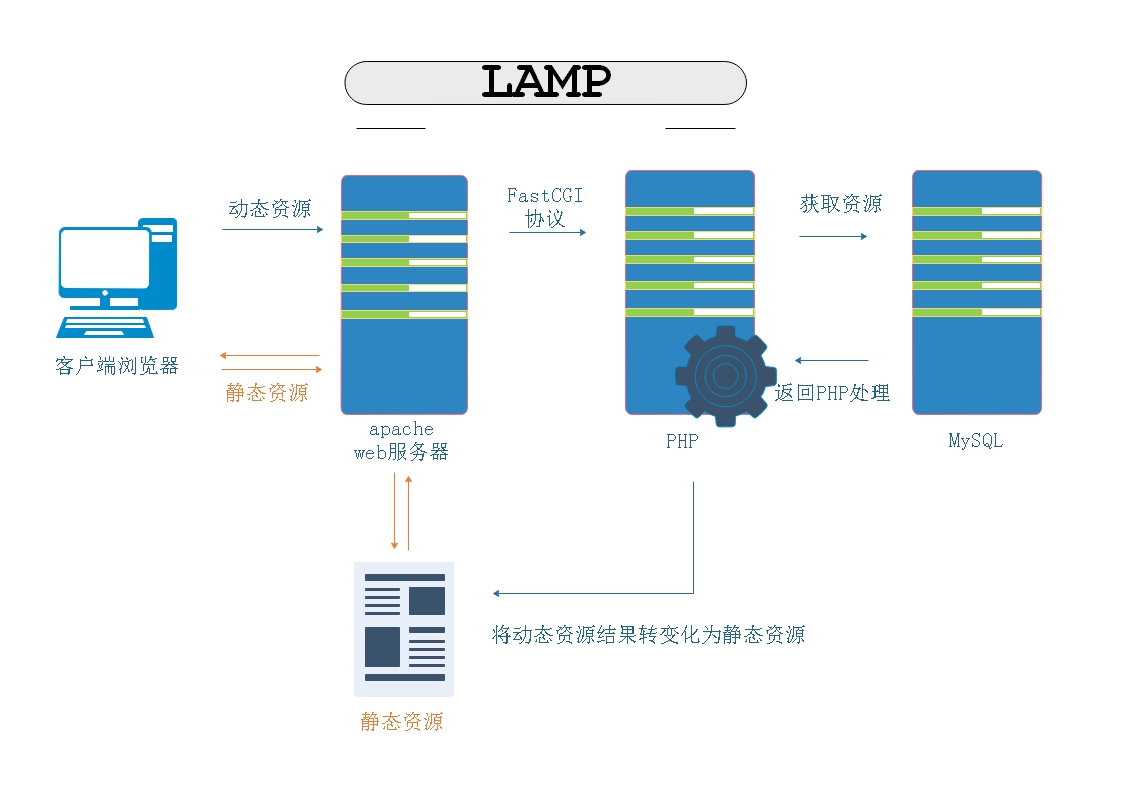
访问流程:客户端访问web服务,web服务器遵循二八法则直接将大部分静态访问资源反馈给客户,如果是动态资源则通过FastCGI协议调用php程序获取数据库的数据处理成为静态资源在返回给客户。
LAMP:web平台的搭配:
| web服务器 | 脚本 | 数据库 |
|---|---|---|
| httpd / nginx | PHP:fpm | Mysql |
| jsp:tomcat | MariaDB | |
| Python:Django | … | |
| ruby:ror |
使用一台主机搭建 wordpress博客
1、安装web服务器(httpd)
[root@ ~]# yum -y install httpd配置:[root@ ~]# vim /etc/httpd/conf/httpd.confServerName www.example.com:80 去掉注释[root@ ~]# httpd -t 检查语法错误[root@ ~]# systemctl start httpd.service 启动服务[root@ ~]# ss -tnl 查看端口State Recv-Q Send-Q Local Address:Port Peer Address:PortLISTEN 0 128 *:80 *:*LISTEN 0 128 *:22 *:*
2、安装脚本php-fpm
[root@ ~]# yum -y install php
3、安装数据库,创建数据库 wordpress,用户名 admin,密码 admin
[root@ ~]# yum -y install mariadb-server[root@ ~]# mysql......MariaDB [(none)]> GRANT ALL ON wordpress.* TO 'admin'@'%' IDENTIFIED BY 'admin';MariaDB [(none)]>exitBye
创建格式:GRANT ALL ON wordpress.* ‘user’@’IP’ IDENTIFIED BY ‘password’
IP域限制例如172.16.%.% ,172.16.1.% ;
测试:
[root@ ~]# mysql -uadmin -h192.168.1.2 -padminWelcome to the MariaDB monitor. Commands end with ; or \g.Your MariaDB connection id is 3Server version: 5.5.56-MariaDB MariaDB ServerCopyright (c) 2000, 2017, Oracle, MariaDB Corporation Ab and others.Type 'help;' or '\h' for help. Type '\c' to clear the current input statement.MariaDB [(none)]> exitBye
4、安装扩展php-mysql
[root@ ~]# yum -y install php-mysql
5、配置安装 wordpress
1、wordpress博客是一个动态资源站点,当客户端访问时需要通过脚本服务器的php-fpm脚本来进行数据处理实现用户与站点的交互。
服务器环境要求
* PHP 5.2.4或更新版本
* MySQL 5.0或更新版本
* Apache mod_rewrite模块(可选,用于支持“固定链接”和“站点网络”功能)
[root@ ~]# mkdir /wordpress[root@ ~]# cd /wordpress[root@ ~]# wget https://cn.wordpress.org/wordpress-4.9.4-zh_CN.zip[root@ ~]# unzip wordpress-4.9.4-zh_CN.zip[root@ ~]# cp -a wordpress /var/www/html/blog[root@ ~]# cd /var/www/html/blog[root@ ~]# cp wp-config-sample.php wp-config.php[root@ ~]# vim wp-config.php// ** MySQL 设置 - 具体信息来自您正在使用的主机 ** ///** WordPress数据库的名称 */define('DB_NAME', 'wordpress');/** MySQL数据库用户名 */define('DB_USER', 'admin');/** MySQL数据库密码 */define('DB_PASSWORD', 'admin');/** MySQL主机 */define('DB_HOST', '192.168.1.2');
6、浏览器打开进行安装配置即可
- 登录主页:192.168.1.2/blog
- 登录后台:192.168.1.2/blog/wp-login.php
注意:跳过域名解析 -如果服务器设置了域名解析,修改配置文件
[root@ ~]# vim /etc/my.cnf.d/server.cnf添加一项:skip-name-resolve=ON 跳过主机名解析。
关闭SELinux
[root@localhost blog]# setenforce 0[root@localhost blog]# getenforcePermissive
马哥笔记 网络资料 网络资料2 网络资料3 百度百科 网络资料4 php-fpm是什么
本文来自投稿,不代表Linux运维部落立场,如若转载,请注明出处:http://www.178linux.com/101646

