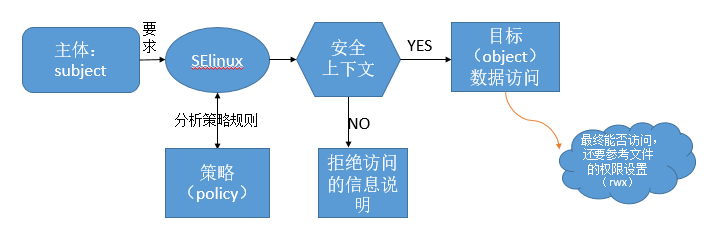
SELinux: Secure Enhanced Linux(安全强化的linux)
SElinux安全上下文是由五个元素组成的:
①User:指示登录系统的用户类型,如root,user_u,system_u,多数本地进程都属于自由(unconfined)进程
②Role:定义文件,进程和用户的用途:文件:object_r,进程和用户:system_r
③Type:指定数据类型,规则中定义何种进程类型访问何种文件Target策略基于type实现,多服务共用:public_content_t
④Sensitivity:限制访问的需要,由组织定义的分层安全级别,如unclassified,secret,top,secret, 一个对象有且只有一个sensitivity,分0-15级,s0最低,Target策略默认使用s0
⑤Category:对于特定组织划分不分层的分类,如FBI Secret,NSA secret, 一个对象可以有多个categroy,c0-c1023共1024个分类,Target 策略不使用category
所有文件和端口资源和进程都具备安全标签:
user:role:type:sensitivity:category
user_u:object_r:tmp_t:s0:c0
[root@CentOS 7 ~]#ll -Z file1
-rw-r--r--. root root unconfined_u:object_r:admin_home_t:s0 file1
.代表受SElinux保护和控制(安全标签)
SElinu策略的文件:
[root@CentOS 7 ~]#cat /etc/selinux/config
# This file controls the state of SELinux on the system.
# SELINUX= can take one of these three values:
# enforcing - SELinux security policy is enforced.    强制模式
# permissive - SELinux prints warnings instead of enforcing.    宽容模式
# disabled - No SELinux policy is loaded.      关闭
SELINUX=enforcing   模式
# SELINUXTYPE= can take one of three two values:
# targeted - Targeted processes are protected,
# minimum - Modification of targeted policy. Only selected processes are protected.
# mls - Multi Level Security protection.
SELINUXTYPE=targeted      策略
getenforce: 获取selinux当前状态
[root@CentOS 7 ~]#getenforce
Enforcing
sestatus:查看selinux状态
[root@CentOS 7 ~]#sestatus
SELinux status:    enabled    是否启动SElinux
SELinuxfs mount:    /sys/fs/selinux    挂载点
SELinux root directory:  /etc/selinux
Loaded policy name:   targeted
Current mode:     enforcing    目前的模式
Mode from config file:    enforcing   配置文件指定的模式
Policy MLS status:    enabled
Policy deny_unknown status:     allowed
Max kernel policy version:      28
setenforce:修改策略 只是临时生效
[root@CentOS 7 ~]#setenforce
      0: 设置为permissive
      1: 设置为enforcing
SElinux的关闭:
在 /etc/selinux/config 配置文件里修改: 永久生效
[root@CentOS 7 ~]#vim /etc/selinux/config
SELINUX=disabled    调整 enforcing|disabled|permissive
SELINUXTYPE=targeted    调整 targeted|strict
改变了策略需要策略,因为SElinux是要整合到内核中去的,也可以在内核文件中禁用SEinux,在
[root@CentOS 7 ~]#vim /boot/grub2/grub.cfg
linux16 /vmlinuz-3.10.0-327.el7.x86_64 root=UUID=da202a08-08d9-4dde-aa75-9c357b2d88bd ro net.ifnames=0 rhgb quiet  selinux=0
修改配置文件后也需要重启,以后开机时就会略过该选项。
SElinux的开启:
开启的方式正好与关闭相反,在/etc/selinux/config文件中SELINUX=enforcing,SELINUXTYPE=targeted,并且到/boot/grub2/grub.cfg文件中看内核里是否有 selinux=0 这行标记,有就把它删除。selinux=0指定给内核时,则内核会自动忽略/etc/selinux/config的设置值,而直接略过SElinux 的加载,模式会变成disabled。
注意:如果从disable转到启动模式时,由于系统必须要针对文件写入安全上下文的信息,因此开机过程会花费不少时间在等待重新打标签,在写完后还得要再次重启一次。
实验1、启用SELinux策略并安装httpd服务,改变网站的默认主目录为/website,添加SELinux文件标签规则,使网站可访问
1,安装httpd服务
[root@CentOS 7 ~]#yum -y install httpd
2,启动httpd服务
[root@CentOS 7 ~]#systemctl start httpd
3,查看端口:
[root@CentOS 7 ~]#netstat -tnl
Proto Recv-Q Send-Q Local Address    Foreign Address     State
tcp6       0    0 :::80           :::*         LISTEN
4,清除防火墙:
[root@CentOS 7 ~]#iptables -F
网页的文件存放在 /var/www/html 目录下
恢复目录或文件默认的安全上下文:
restorecon[-R] /path/to/somewhere
[root@CentOS 7 html]#echo hello work > index.html    网页可以正常访问
[root@CentOS 7 html]#cp index.html /root
[root@CentOS 7 html]#mv /root/index.html .
mv: overwrite ‘./index.html’? y
[root@CentOS 7 html]#ll -Z index.html    网页不可以正常访问,文件在移动时将原文件的属性改变,附带所在目录的属性
-rw-r--r--. root root unconfined_u:object_r:admin_home_t:s0 index.html
[root@CentOS 7 html]#echo hello work > index2.html
[root@CentOS 7 html]#ll -Z index2.html   网页可以正常访问
-rw-r--r--. root root unconfined_u:object_r:httpd_sys_content_t:s0 index2.html
[root@CentOS 7 html]#cp index2.html /root
[root@CentOS 7 html]#cp /root/index2.html .
cp: overwrite ‘./index2.html’? y
[root@CentOS 7 html]#ll -Z index2.html   网页可以正常访问,文件在复制时会保留原文件的属性
-rw-r--r--. root root unconfined_u:object_r:httpd_sys_content_t:s0 index2.html
期望(默认)上下文:存放在二进制的SELinux策略库(映射目录和期望安全上下文)中
semanagefcontext–l
[root@CentOS 7 html]#semanage fcontext -l |grep "/var/www"
/var/www(/.*)?    all files   system_u:object_r:httpd_sys_content_t:s0
[root@CentOS 7 html]#restorecon index.html    修改文件的标签
[root@CentOS 7 html]#ll -Z
-rw-r--r--. root root unconfined_u:object_r:httpd_sys_content_t:s0 index2.html
-rw-r--r--. root root unconfined_u:object_r:httpd_sys_content_t:s0 index.html
[root@CentOS 7 ~]#restorecon -R /var/www/html    修改目录的标签
[root@CentOS 7 html]#chcon --reference index2.html index.html  参考某文件或目录修改属性
5,将web服务的网页的默认目录修改为/website
[root@CentOS 7 html]#vim /etc/httpd/conf/httpd.conf 修改配置文件
DocumentRoot "/var/www/html"      修改为/website
# Relax access to content within /var/www.
<Directory "/var/www">       修改为/website
    AllowOverride None
    # Allow open access:
    Require all granted
</Directory>
[root@CentOS 7 html]#mkdir /website
[root@CentOS 7 html]#cd /website/
[root@CentOS 7 website]#echo hello work > index.html
[root@CentOS 7 website]#ll -Z
-rw-r--r--. root root unconfined_u:object_r:default_t:s0 mywebsite
[root@CentOS 7 website]#systemctl restart httpd
[root@CentOS 7 website]#chcon -R --reference /var/www/html /website
[root@CentOS 7 website]#ll -dZ /website /var/www/html
drwxr-xr-x. root root system_u:object_r:httpd_sys_content_t:s0 /var/www/html
drwxr-xr-x. root root system_u:object_r:httpd_sys_content_t:s0 /website
实验2、修改上述网站的http端口为9527,增加SELinux端口标签,使网站可访问
SElinux端口标签:
查看端口标签
semanage port –l
添加端口
semanage port -a -t port_label-p tcp|udp PORT
例:semanage port -a -t http_port_t -p tcp 9527
删除端口
semanage port -d -t port_label-p tcp|udp PORT
例:semanage port -d -t http_port_t -p tcp 9527
修改现有端口为新标签
semanage port -m -t port_label-p tcp|udp PORT
例:semanage port -m -t http_port_t-p tcp 9527
1,修改httpd端口号为9527
[root@CentOS 7 ~]#vim /etc/httpd/conf/httpd.conf
    Listen 9527
2,增加SElinux端口标签
[root@CentOS 7 ~]#semanage port -a -t http_port_t -p tcp 9527
[root@CentOS 7 html]#echo "welcome" > index.html
3,重启服务
[root@CentOS 7 ~]#systemctl restart httpd
[root@CentOS 7 html]#netstat -tnl
tcp6       0      0 :::9527         :::*          LISTEN
4,访问网站
实验3、启用相关的SELinux布尔值,使上述网站的用户student的家目录可通过http访问
SELinux布尔值
布尔型规则:
getsebooll;
setsebool
查看bool命令:
getsebool [-a] [boolean]
semanage boolean –l
semanage boolean -l –C 查看修改过的布尔值
设置bool值命令:
setsebool [-P] boolean value(on,off)
setsebool [-P] Boolean=value(0,1)
1,编辑配置文件
[root@CentOS 7 ~]#vim /etc/httpd/conf.d/userdir.conf
#   UserDir  disabled
      UserDir   public_html
2,重启httpd服务
[root@CentOS 7 ~]#systemctl restart httpd
3,在student家目录下创建网页文件
[root@CentOS 7 ~]#mkdir /home/student/public_html
[root@CentOS 7 ~]#echo "this is student's home" > /home/student/public_html/index.html
4,启用相关的SElinux布尔值
[root@CentOS 7 ~]#setsebool -P httpd_enable_homedirs on
5,设置apache对用户student的家目录有执行权限
[root@CentOS 7 ~]#setfacl -m u:apache:x /home/student
6,访问网站
SELinux日志管理
将错误的信息写入/var/log/message
yum install setroublesshoot*(重启生效)
查看安全事件日志说明
grep setroubleshoot/var/log/messages
sealert -l UUID
扫描并分析日志
sealert -a /var/log/audit/audit.log
SELinux帮助
yum -y install selinux-policy-devel(centos7)
yum –y install selinux-policy-doc (centos6)
mandb | makewhatis g
man -k selinux
原创文章,作者:pingsky,如若转载,请注明出处:http://www.178linux.com/48887


