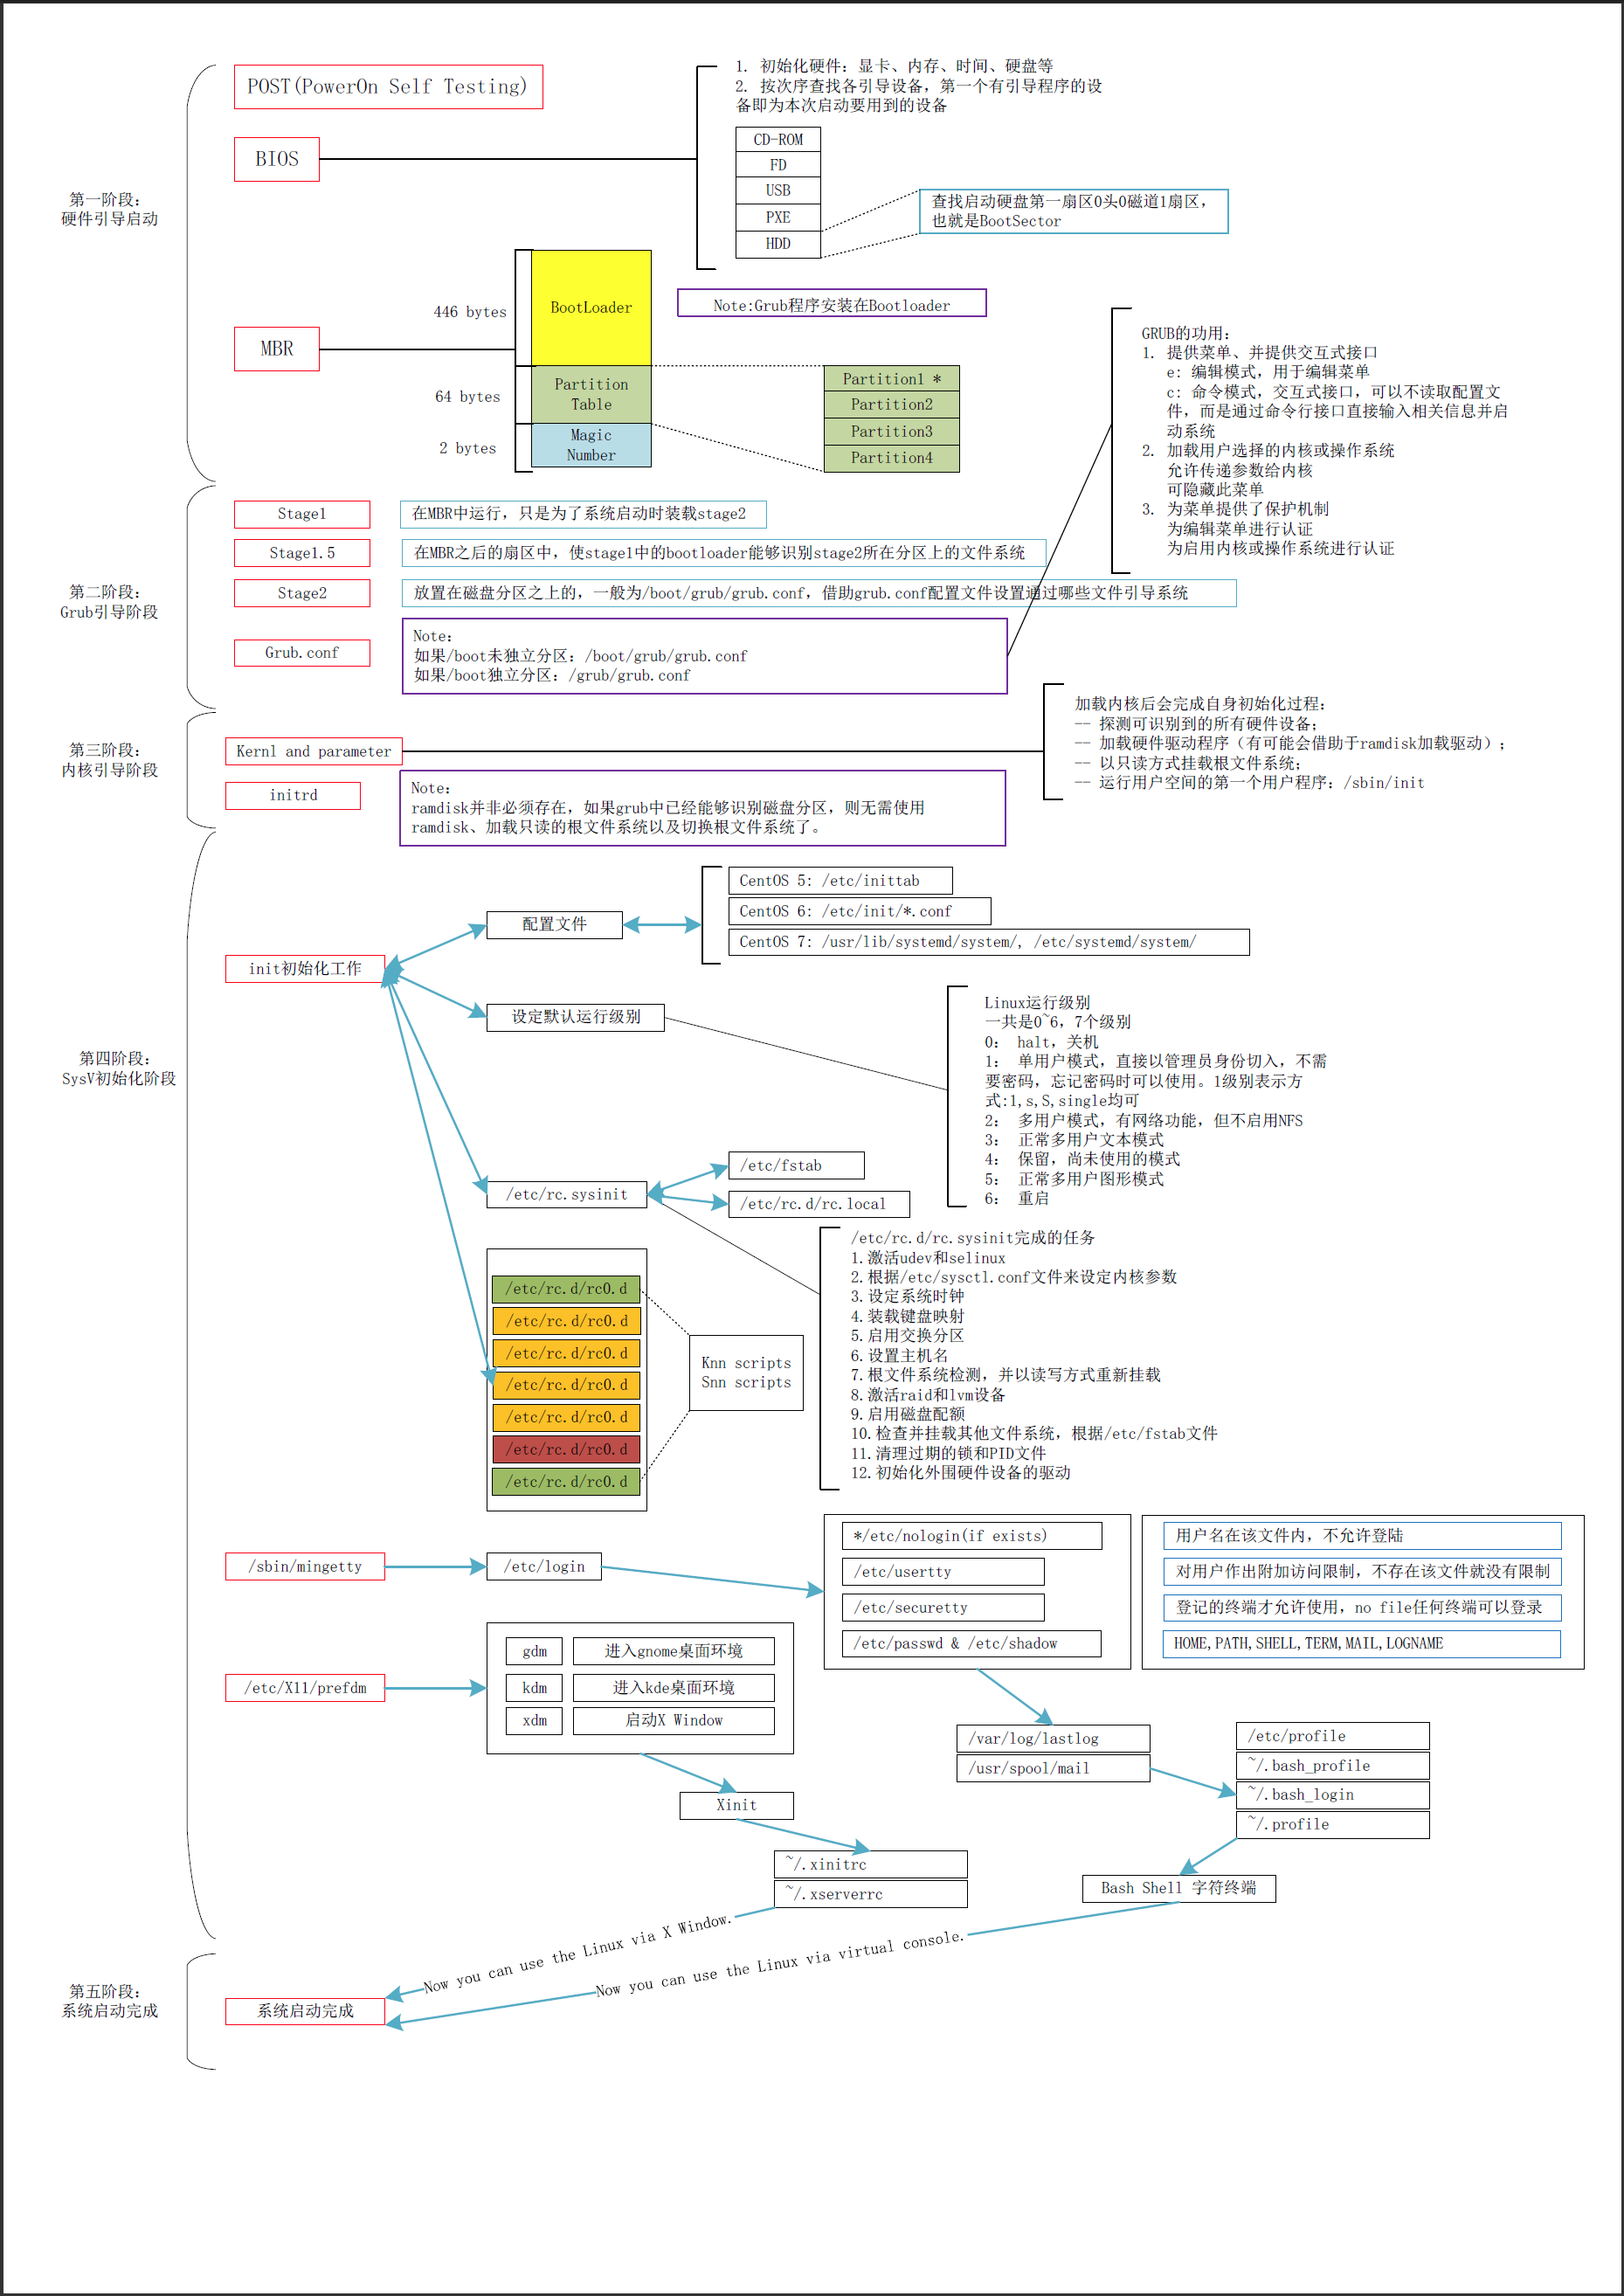
1. 请详细描述CentOS系统的启动流程(详细到每个过程系统做了哪些事情)
2. 为运行于虚拟机上的CentOS6添加一块硬盘,提供两个主分区;
(1) 为硬盘新建两个主分区,并为其安装grub
(2) 为硬盘的第一个主分区提供内核和ramdisk文件,第二个分区提供rootfs
(3) 为rootfs提供bash、ls、cat程序及所依赖的库文件
(4) 为grub提供配置文件
(5) 将新的硬盘设置为第一启动项并能够正常启动目标主机
“`
~]# fdisk -l /dev/sdb
Disk /dev/sdb: 17.2 GB, 17179869184 bytes
255 heads, 63 sectors/track, 2088 cylinders
Units = cylinders of 16065 * 512 = 8225280 bytes
Sector size (logical/physical): 512 bytes / 512 bytes
I/O size (minimum/optimal): 512 bytes / 512 bytes
Disk identifier: 0x00000000
~]# fdisk /dev/sdb,创建两个主分区,并设置为83格式。
~]# kpartx -af /dev/sdb
~]# mkdir -pv /mnt/boot
mkdir: created directory `/mnt/boot’
~]# mkfs.ext4 /dev/sdb1
~]# mount /dev/sdb1 /mnt/boot
~]# grub-install –root-directory=/mnt /dev/sdb
Probing devices to guess BIOS drives. This may take a long time.
Installation finished. No error reported.
This is the contents of the device map /mnt/boot/grub/device.map.
Check if this is correct or not. If any of the lines is incorrect,
fix it and re-run the script `grub-install’.
(fd0) /dev/fd0
(hd0) /dev/sda
(hd1) /dev/sdb
~]# cp /boot/vmlinuz-2.6.32-431.el6.x86_64 /mnt/boot/vmlinuz
~]# cp /boot/initramfs-2.6.32-431.el6.x86_64.img /mnt/boot/initramfs.img
~]# vim /mnt/boot/grub/grub.conf
default=0
timeout=5
title CentOS (Express)
root (hd0,0)
kernel=/vmlinuz ro selinux=0 root=/dev/sda2 init=/bin/bash
initrd /initramfs.img
~]# mkdir /mnt/sysroot
~]# mkfs.ext4 /dev/sdb2
~]# mount /dev/sdb2 /mnt/sysroot
使用拷贝命令及其依赖库的脚本进行命令复制。
==========================================================================
#!/bin/bash
#
DEST=/mnt/sysroot
read -p “Please enter a command: ” CPCMD
until [ $CPCMD == ‘q’ ]; do
if `/usr/bin/which $CPCMD &> /dev/null`; then
CMDPATH=`/usr/bin/which $CPCMD | grep -o “/.*$CPCMD”`
DESTCMD=`dirname $CMDPATH`
ls $DEST$DESTCMD &> /dev/null || mkdir -pv “$DEST$DESTCMD” &> /dev/null
cp $CMDPATH $DEST$DESTCMD/
echo -e “\n\033[31mCommand $CPCMD has been copied to $DEST$DESTCMD.\033[0m\n”
for dep in `ldd $CMDPATH | grep -o “/[^[:space:]]*”`; do
DESTLIB=`dirname $dep`
ls $DEST$DESTLIB &> /dev/null || mkdir -pv “$DEST$DESTLIB” &> /dev/null
cp $dep $DEST$DESTLIB/
echo -e “\033[35mDependency Library $dep has been copied to $DEST$DESTLIB.\033[0m”
done
else
echo “Wrong command or builtin command.”
fi
read -p “Please reenter a command: ” CPCMD
done
==========================================================================
执行sync命令确保数据已经全部写入到磁盘
新建虚拟机,并指定该新增磁盘为新虚拟机的唯一磁盘,启动即可。
“`
3. 制作一个kickstart文件以及一个引导镜像。描述其过程。
~]# yum -y install system-config-kickstart
这个命令是需要单独安装的:
~]# yum -y install system-config-kickstart
该软件需要调用图形界面,首先应该确保服务器上的图形界面已经安装完成,并且X windows已经启动了。
~]# startx
~]# ps -ef | grep X
使用SecureCRT SSH远程连接到服务器,需要设置几个地方才能够使用system-config-kickstart命令
“`
(1) 编辑sshd_config:
~]# vi /etc/ssh/sshd_config 确保有如下的行:
X11Forwarding yes
这样配置的作用就是允许 SSH的X 转发。
(2) 下载并安装Xming
Xming 是一个配置简单而功能强大的开源 X Server,可以运行在MS的XP/2003/Vista操作系统下。
Xming 的主页:http://www.straightrunning.com/XmingNotes/
Xming 的SourceForge 页面:http://sourceforge.net/projects/xming/
这里下载到Xming-6-9-0-31-setup.exe,双击安装至完成。
(3) 在SecureCRT中右键点击要使用system-config-kickstart命令的Linux服务器 –> 属性(properities)–> Connection –> Port Forwarding –> Remote/X11 –> 勾选“Forward X11 packets”和“Enforce X11 authentication”
(4) 在SecureCRT中右键点击要使用system-config-kickstart命令的Linux服务器 –> 属性(properities)–> Connection –> Port Forwarding –> Add –> 输入转发名称(自己决定)–> 端口号6000 –> 在Application处选择xming.exe文件的绝对路径 –> 点击OK
“`
~]# system-config-kickstart &
按照自己的想法设定所有安装选项,并将配置最终保存下来。
将Linux安装光盘加载至光驱
~]# mkdir /mnt/media
~]# mount /dev/sr0 /mnt/media
~]# cp -r /mnt/media/isolinux/ /myboot/
~]# cp /PATH/TO/KS_FILE /myboot/
~]# mkisofs -R -J -T -v –no-emul-boot –boot-load-size 4 –boot-info-table -V “CentOS 6 x86_64 boot” -c isolinux/boot.cat -b isolinux/isolinux.bin -o /root/boot.iso /myboot/
使用boot.iso启动系统
4. 写一个脚本
(1) 能接受四个参数:start,stop,restart,status
start:输出“starting 脚本名 finished.”
……
(2) 其他任意参数,均报错退出
“`
#!/bin/bash
#
read -p “Please make a choice {start|stop|restart|status}: ” Choice
case $Choice in
start)
echo “Starting script finished.”
;;
stop)
echo “Stopping script finished.”;;
restart)
echo “Restarting script finished.”;;
status)
echo “Checking script status finished.”;;
*)
echo “Wrong choice.”
esac
“`
5. 写一个脚本,判断给定的用户是否登陆了当前系统;
(1) 如果登陆了,则显示用户登录,脚本终止
(2) 每3秒钟,查看一次用户是否登陆;
“`
#!/bin/bash
#
while true; do
who | grep “tom” &> /dev/null
RETVAL=$?
if [ $RETVAL -eq 0 ]; then
echo user tom has logged into the system at `date +’%Y%m%d %H:%M’`
exit 0
fi
sleep 3
done
“`
6. 写一个脚本,显示用户选定要查看的信息
cpu) display cpu info
mem) display memory info
disk) display disk info
quit) quit
非此四项,则提示错误,并要求用户重新选择,直到给出正确选择为止
“`
#!/bin/bash
#
cat << EOF
Please make a choice:
cpu) display cpu info
mem) display memory info
disk) display disk info
quit) quit
EOF
read -p “Your choice: ” CHOICE
while true; do
case $CHOICE in
cpu)
cat /proc/cpuinfo
exit 0;;
mem)
free -m
exit 0;;
disk)
fdisk -l
exit 0;;
quit)
echo “Quiting…”
exit 0;;
*)
echo “Wrong choice.”
read -p “Your choice: ” CHOICE
esac
done
“`
7. 写一个脚本
(1) 用函数实现返回一个用户的UID和SHELL;用户名通过参数传递而来
(2) 提示用户输入一个用户名或输入“quit”退出;
当输入的是用户名,则调用函数显示用户信息;
当输入quit,则退出脚本;进一步地,显示键入的用户相关信息后,再次提醒输入用户名或quit
“`
#!/bin/bash
#
function User_UID_Shell {
User_UID=`cat /etc/passwd | grep “^$1” | cut -d’:’ -f3`
User_SHELL=`cat /etc/passwd | grep “^$1” | cut -d’:’ -f7`
echo “User $1’s UID is $User_UID.”
echo “User $1’s Shell is $User_SHELL.”
}
read -p “Please input a username or ‘quit’ to quit this script: ” user_name
while true; do
[ $user_name == ‘quit’ ] && echo “Quiting…” && exit 0
id $user_name &> /dev/null
RETVAL=$?
if [ $RETVAL -eq 0 ]; then
User_UID_Shell $user_name
read -p “Please input a username or ‘quit’ to quit this script: ” user_name
else
echo “User $user_name does not exist.”
read -p “Please input a username or ‘quit’ to quit this script: ” user_name
fi
done
“`
本文来自投稿,不代表Linux运维部落立场,如若转载,请注明出处:http://www.178linux.com/89573


评论列表(1条)
图如果是你自己画的,那就很牛逼了。下面的作业注意排版。