

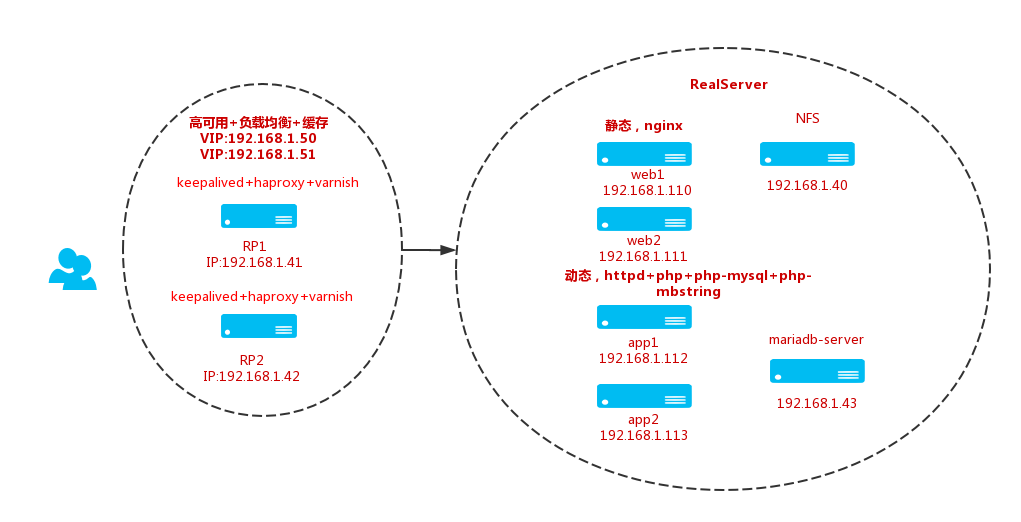
nfs: 192.168.1.40
rp1: 192.168.1.41
rp2: 192.168.1.42
mariadb: 192.168.1.43
web1: 192.168.1.110
web2: 192.168.1.111
app1: 192.168.1.112
app2: 192.168.1.113
实验效果:用keepalived高可用反向代理服务器haproxy,将静态页面反代到varnish缓存服务器,动态页面反代到后端的app服务器,访问内容如果在缓存服务器上有缓存,就直接返回,如果没有就到后端web服务器取
NFS:192.168.1.40
- yum install nfs-utils rpcbind
- vim /etc/exports
/mnt/share 192.168.1.0/24(rw,async,all_squash)mkdir /mnt/share
systemctl start nfs rpcbind
showmount -e 192.168.1.40
- chmod o+w /mnt/share
//给目录一个写权限,因为之后要将此目录挂载到web和app服务上,以备上传图片
app1:192.168.1.41
- yum install -y epel-releaseyum install -y haproxy varnish keepalived
ntpdate 192.168.1.64
haproxy配置
- cd /etc/haproxy
- vim haproxy.cfg
global
log 127.0.0.1 local2
chroot /var/lib/haproxy
pidfile /var/run/haproxy.pid
maxconn 4000
user haproxy
group haproxy
daemon
stats socket /var/lib/haproxy/stats
defaults
mode http
log global
option httplog
option dontlognull
option http-server-close
option forwardfor except 127.0.0.0/8
option redispatch
retries 3
timeout http-request 10s
timeout queue 1m
timeout connect 10s
timeout client 1m
timeout server 1m
timeout http-keep-alive 10s
timeout check 10s
maxconn 3000`
frontend myweb *:80
compression algo gzip
compression type text/html text/plain application/xml application/javascript
reqadd X-Proxy-By:\ HAProxy
default_backend websrvs
acl websrvs path_end -i .jpg .jpeg .htm .gif .png .css .js .ico
//请求报文中以此类结尾的都定义为websrvs
acl appsrvs path_end .php
use_backend appsrvs if appsrvs
//调用下面定义的dynsrvs的服务器,如果附合acl定义的
appsrvs规则
use_backend websrvs if websrvs
backend websrvs
balance roundrobin
server srv1 192.168.1.41:6081 check inter 3000ms rise 2 fall 2
server srv2 192.168.1.42:6081 check inter 3000ms rise 2 fall 2
backend appsrvs
balance source
server dynsrv1 192.168.1.112:80 check inter 3000ms rise 2 fall 2
server dynsrv2 192.168.1.113:80 check inter 3000ms rise 2 fall 2
listen stats
bind *:9099
stats enable
stats uri /myproxy?admin
stats realm “HAProxy Stats Page”
stats auth admin:admin
stats admin if TRUE
varnish配置
- cd /etc/varnish
- vim varnish.params
VARNISH_STORAGE=”file,/data/varnish/cache,1g”
//注释掉用内存缓存访问,改为用磁盘缓存
- vim default.vcl
vcl 4.0;
import directors;
backend websrv1 {
.host = “192.168.1.110”;
.port = “80”;
}
backend websrv2 {
.host = “192.168.1.111”;
.port = “80”;
}
backend appsrv1 {
.host = “192.168.1.112”;
.port = “80”;
}
backend appsrv2 {
.host = “192.168.1.113”;
.port = “80”;
}
sub vcl_init {
new staticsrvs = directors.round_robin();
staticsrvs.add_backend(websrv1);
staticsrvs.add_backend(websrv2);
new appsrvs = directors.hash();
appsrvs.add_backend(appsrv1,1);
appsrvs.add_backend(appsrv2,1);
}
sub vcl_recv {
if (req.url ~ “(?i).(css|js)$”) {
set req.backend_hint =appsrvs.backend(req.http.cookie);
}
if (req.url ~ “(?i).(jpg|jpeg|png|gif)$”) {
set req.backend_hint = staticsrvs.backend();
} else {
set req.backend_hint = appsrvs.backend(req.http.cookie);
}
}
sub vcl_backend_response {
if (beresp.http.cache-control !~ “s-maxage”) {
if (bereq.url ~ “(?i).(jpg|jpeg|png|gif|css|js|html|htm)$”) {
unset beresp.http.Set-Cookie;
set beresp.ttl = 3600s;
}
}
}
//定义符合条件的文件由varnish缓存3600秒
sub vcl_deliver {
if (obj.hits>0) {
set resp.http.X-Cache=”Hit via ” + server.ip;
} else {
set resp.http.X-Cache=”Miss from ” + server.ip;
}
}
keepalived配置
- vim /etc/keepalived/keepalived.conf
! Configuration File for keepalived
global_defs {
notification_email {
root@localhost
}
notification_email_from keepalived@localhost
smtp_server 127.0.0.1
smtp_connect_timeout 30
router_id node1
vrrp_skip_check_adv_addr
vrrp_strict
vrrp_garp_interval 0
vrrp_gna_interval 0
vrrp_mcast_group4 224.1.101.30
}
vrrp_instance VI_1 {
state MASTER
interface eno16777736
virtual_router_id 51
priority 100
advert_int 1
authentication {
auth_type PASS
auth_pass 1234
}
virtual_ipaddress {
192.168.1.50/24 dev eno16777736 label eno16777736:0
}
notify_master “/etc/keepalived/notify.sh master”
notify_backup “/etc/keepalived/notify.sh backup”
}
vrrp_instance VI_2 {
state BACKUP
priority 96
interface eno16777736
virtual_router_id 52
advert_int 1
authentication {
auth_type PASS
auth_pass 1234
}
virtual_ipaddress {
192.168.1.51/24 dev eno16777736 label eno16777736:0
}
notify_master “/etc/keepalived/notify.sh master”
notify_backup “/etc/keepalived/notify.sh backup”
}
keepalived 报警脚本
vim /etc/keepalived/notify.sh
#!/bin/bash
contact=’root@localhost’
//定义谁可以接收邮件
notify() {
local mailsubject=”$(hostname) to be $1, vip floating”
//声明本地局部变量,mailsubject是声明标题的,$(hostname)是当前主机名,意思是当前主机发生了变化,VIP流动了,$1是状态,给什么状态就显示什么状态
local mailbody=”$(date +’%F %T’): vrrp transition, $(hostname) changed to be $1″
//这是定义邮件正文的,$(date +’%F %T’)是时间,意思是在这个时刻vrrp发生了状态转移,$(hostname)当前主机变成了$1状态
echo “$mailbody” | mail -s “$mailsubject” $contact
//调用本地邮件服务器向本地用户发邮件,如果要使用互联网上的邮件服务器发邮件要用python写脚本
}
case $1 in
//$1是脚本的位置变量,看传输的是下面的哪一个什么
master)
notify master
;;
backup)
notify backup
;;
fault)
notify fault
;;
*)
echo “Usage: $(basename $0) {master|backup|fault}”
exit 1
;;
esac
chmod +x notify.sh
bash -n notify.sh
//检查语法
bash -x notify.sh master
systemctl start haproxy varnish keepalived
//启动所有服务
app2:192.168.1.42
app2服务器上所安装的软件与配置与app1上是一致的,只是将keepalived的配置做一下调整,如下
! Configuration File for keepalived
global_defs {
notification_email {
root@localhost
}
notification_email_from keepalived@localhost
smtp_server 127.0.0.1
smtp_connect_timeout 30
router_id node1
vrrp_skip_check_adv_addr
vrrp_strict
vrrp_garp_interval 0
vrrp_gna_interval 0
vrrp_mcast_group4 224.1.101.30
}
vrrp_instance VI_1 {
state BACKUP
interface eno16777736
virtual_router_id 51
priority 96
advert_int 1
authentication {
auth_type PASS
auth_pass 1234
}
virtual_ipaddress {
192.168.1.50/24 dev eno16777736 label eno16777736:0
}
notify_master “/etc/keepalived/notify.sh master”
notify_backup “/etc/keepalived/notify.sh backup”
}
vrrp_instance VI_2 {
state MASTER
priority 100
interface eno16777736
virtual_router_id 52
advert_int 1
authentication {
auth_type PASS
auth_pass 1234
}
virtual_ipaddress {
192.168.1.51/24 dev eno16777736 label eno16777736:0
}
notify_master “/etc/keepalived/notify.sh master”
notify_backup “/etc/keepalived/notify.sh backup”
}
mariadb:192.168.1.43
1.yum install -y mariadb-server
2.vim /etc/my.cnf
skip_name_resolve=ON
innodb_file_per_table=ON
mysql_secure_installation
Set root password? [Y/n] y #是否设置密码
New password: #输入要设置的密码
Re-enter new password:
Remove anonymous users? [Y/n] y #是否删除匿名用户
Disallow root login remotely? [Y/n]n
#是否禁止管理员远程登录(为了试验方便,设置成不要,生成中禁止远程登录)
Remove test database and access to it? [Y/n]n
#删除测试数据库
Reload privilege tables now? [Y/n]y #重载
mysql -uroot -pcentos
create database wordpress;
grant all on wordpress.* to ‘wps’@’%’ identified by ‘centos’;
flush privileges;
mysql -uwps -pcentos
systemctl start mariadb
web1:192.168.1.110
- yum install -y epel-releaseyum install -y nginx nfs-utils
- vim /etc/nginx/conf.d/web.conf
server {
server_name 192.168.1.110;
index index.html;
root /data/apps;
}
- systemctl start nginx
- mkdir -p /data/apps
- 上传wordpress软件包到服务器
- unzip wordpress-4.3.1-zh_CN.zip
- cp -r wordpress /data/apps
- cd /data/apps
- ln -sv wordpress wps
- mkdir /data/apps/wps/wp-content/uploads
- mount -t nfs 192.168.1.40:/mnt/share /data/apps/wps/wp-content/uploads
- mkdir /data/apps/wps/html
- mount -t nfs 192.168.1.40:/mnt/html /data/apps/wps/html
web2:192.168.1.111
- yum install -y epel-releaseyum install -y nginx nfs-utils
- vim /etc/nginx/conf.d/web.conf
server {
server_name 192.168.1.111;
index index.html;
root /data/apps;
}
- systemctl start nginx
- mkdir -p /data/apps
- 上传wordpress软件包到服务器
- unzip wordpress-4.3.1-zh_CN.zip
- cp -r wordpress /data/apps
- cd /data/apps
- ln -sv wordpress wps
- mkdir /data/apps/wps/wp-content/uploads
- mount -t nfs 192.168.1.40:/mnt/share /data/apps/wps/wp-content/uploads
- mkdir /data/apps/wps/html
- mount -t nfs 192.168.1.40:/mnt/html /data/apps/wps/html
app1:192.168.1.112
- yum install httpd php-mysql php-mbstring nfs-utils
- vim /etc/httpd/conf.d/app.conf
<VirtualHost 192.168.1.112:80>
DocumentRoot “/data/apps”
DirectoryIndex index.php index.html
<Directory “/data/apps”>
Options FollowSymLinks
AllowOverride All
Require all granted
</Directory>
CustomLog “logs/wp_access.log” combined
ErrorLog “logs/wp_error.log”
</VirtualHost>
- mkdir -p /data/apps
- 上传wordpress软件包到服务器
- unzip wordpress-4.3.1-zh_CN.zip
- cp -r wordpress /data/apps
- cd /data/apps
- ln -sv wordpress wps
- cd wps
- cp wp-config-sample.php wp-config.php
- vim wp-config.php
/** WordPress数据库的名称 */
define(‘DB_NAME’, ‘wordpress’);
/** MySQL数据库用户名 */
define(‘DB_USER’, ‘wps’);
/** MySQL数据库密码 */
define(‘DB_PASSWORD’, ‘centos’);
/** MySQL主机 */
define(‘DB_HOST’, ‘192.168.1.43’);
- systemctl start httpd
- mkdir /data/apps/wps/wp-content/uploads
- mount -t nfs 192.168.1.40:/mnt/share /data/apps/wps/wp-content/uploads
- mkdir /data/apps/wps/html
- mount -t nfs 192.168.1.40:/mnt/html /data/apps/wps/html
app2:192.168.1.113
- yum install httpd php-mysql php-mbstring nfs-utils
- vim /etc/httpd/conf.d/app.conf
<VirtualHost 192.168.1.113:80>
DocumentRoot “/data/apps”
DirectoryIndex index.php index.html
<Directory “/data/apps”>
Options FollowSymLinks
AllowOverride All
Require all granted
</Directory>
CustomLog “logs/wp_access.log” combined
ErrorLog “logs/wp_error.log”
</VirtualHost>
- mkdir -p /data/apps
- 上传wordpress软件包到服务器
- unzip wordpress-4.3.1-zh_CN.zip
- cp -r wordpress /data/apps
- cd /data/apps
- ln -sv wordpress wps
- cd wps
- cp wp-config-sample.php wp-config.php
- vim wp-config.php
/** WordPress数据库的名称 */
define(‘DB_NAME’, ‘wordpress’);
/** MySQL数据库用户名 */
define(‘DB_USER’, ‘wps’);
/** MySQL数据库密码 */
define(‘DB_PASSWORD’, ‘centos’);
/** MySQL主机 */
define(‘DB_HOST’, ‘192.168.1.43’);
- systemctl start httpd
- mkdir /data/apps/wps/wp-content/uploads
- mount -t nfs 192.168.1.40:/mnt/share /data/apps/wps/wp-content/uploads
- mkdir /data/apps/wps/html
- mount -t nfs 192.168.1.40:/mnt/html /data/apps/wps/html
修改本机hosts文件
加入 www.test.com 192.168.1.50 www.test.com 192.168.1.51
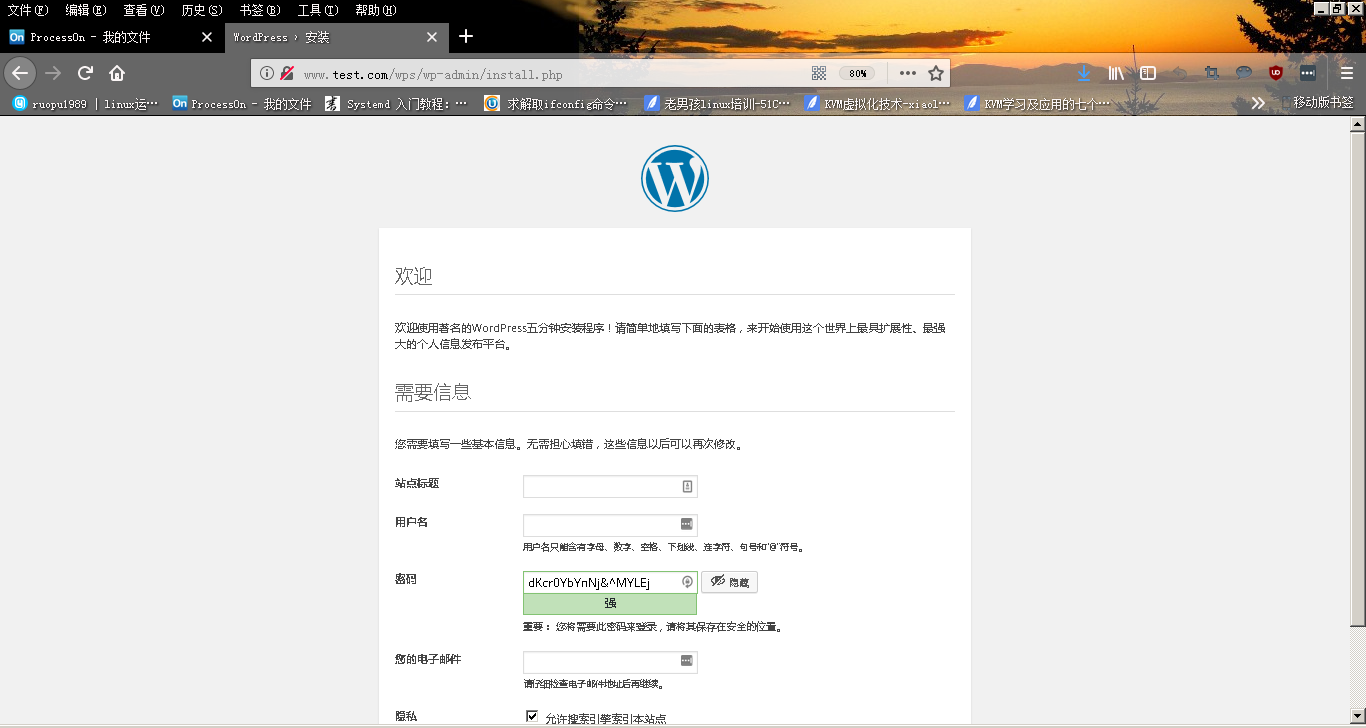
测试:

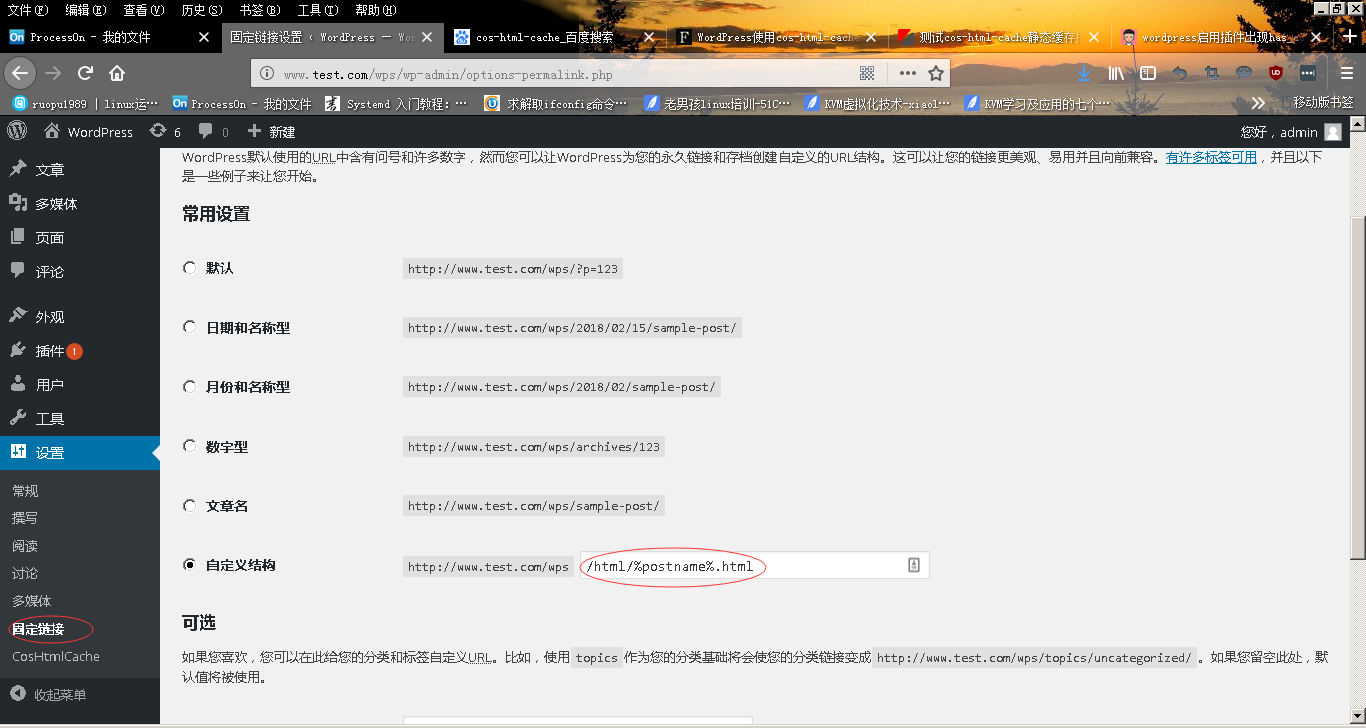
将固定链接改为html形式
本文来自投稿,不代表Linux运维部落立场,如若转载,请注明出处:http://www.178linux.com/91596
